Groups and group sets
The Groups feature enables you to organise references, for example by research topic, chapter or assignment.
- A single reference can belong to more than one group.
- Groups can be organised using Group sets.
Create a group
- On the EndNote toolbar click Groups > Create Group.
- Type in a name, such as your course code or a research topic. Press Enter.
- The new group appears on the left under My Groups.
- You can also right-clck on My Groups and choose Create Group.
Add references to a group
- Drag-and-drop selected references from All References to the group in the Groups panel.
- Alternatively, select the reference/s you want to add, right-click and choose Add References To or click Groups > Add References To. Select the group name or Create a Custom Group.
Remove references from a group
- Select the Group on the left column
- From the group display highlight the reference/s to be deleted
- Select Groups > Remove References From Group, or use: Windows/PC:<Ctrl+D>, Mac: <Cmd+D >
Note: The selected references will be removed from the Group, they will not be deleted from the library. However, deleting a reference from All References will delete it from any group it is in and move it from your EndNote Library into the Trash folder. Deleted references will remain in the Trash folder until they are permanently deleted.
Delete a group
- In the Groups panel right-click the group name and choose Delete Group, or highlight the group name and click Groups > Delete Group.
Note: Deleting a group does not delete references from your All References folder.
Create a group set
If you have many groups in your Library, you can organise groups by themes or topics using the Group Set function.
- Click Groups > Create Group Set.
- Enter a name for the Group Set and press Enter.
- Select existing groups and drag and drop them into the new Group Set.
Search your library
EndNote provides two search options: Simple search and Advanced search.
Using Simple Search
This is the default search option for a quick, simple search. Search terms entered here will search all the fields in the records. Any references with words that match the search terms will be retrieved.
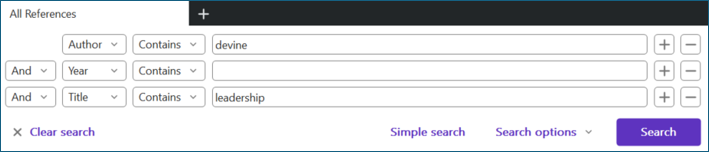
Using Advanced Search
This search option enables searching on particular fields or terms, or combinations of both.
- The default displays preset fields for Author, Year and Title.
- Use the drop-down arrow to specify a particular field, e.g., Any Field, Title, Author, Keywords or Research Notes.
- Enter your search terms, click Search.
- For complex searches use multiple search boxes and terms.
- Search results can be used to create a new Smart Group or added to an existing group.
- To restore the All References view, click All References.
Note: You can use Search to find references you have tagged in the Notes or Keywords fields, to retrieve references that relate to a particular project or topic.
Create a Smart Group
A Smart Group is a saved EndNote search that automatically adds records to a group. After you set up a Smart Group, any references that you add to your Library which match the search parameters will be added to the group.
Convert an existing search to a Smart Group
- Conduct a search using the search panel: select the fields, such as Author, Keywords, or Year, and enter your search terms.
- On the search panel, select Search options > Convert to Smart Group.
- This will create a new group in the Groups panel called Converted Search.
- Rename it by double-clicking Converted Search and typing in a name.
- The group will be renamed and automatically populated with references that match the search requirements.
Create a smart group from the Groups options
- Click Groups > Create Smart Group
- Enter the group name and search keywords.
- The group will appear in the group panel, populated with the references that match the search parameters.
Delete duplicates
When new references are added to your library, EndNote does not automatically check for duplication. Duplicate references within your EndNote library are a potential source of confusion and errors. It is recommended that you delete any duplicates regularly.
- Select Library > Find Duplicates
- EndNote finds duplicates and compares two records side-by-side. Any fields within the records that differ from each other are highlighted.
- Check any highlighted fields and decide which one to keep using Keep This Record. You can also edit the record you want to keep with information from the record you will delete.

- If you have more than two records for the same item in your library, it will compare the record multiple times.
- Repeat the above steps to go through all duplicate records.
Note: Occasionally Find Duplicates does not identify all duplicates. You should regularly sort your references by Title to spot any additional duplicates that are missed.
Merge libraries
We strongly recommend maintaining a single EndNote library that stores all your references. However, if you are doing some research that requires documenting the research process (eg. a systematic review), then having a second library to keep the research separate is needed.
There is an easy process to merge different EndNote libraries.
- Open the library that will become your main library (the library that will incorporate the others) and then open the secondary library.
- Return to your main library.
- Depending on your operating system, follow the instructions below.
Windows/PC
- From your main library's EndNote toolbar select File > Import > File to open the Import dialog pop-up.
- Select Choose, navigate to and select the secondary library.
- Set Import Option to EndNote Library
- Choose an option for Duplicates:
- Import All - imports all references, including duplicates.
- Discard Duplicates - imports references apart from the ones that are duplicated in both libraries (recommended).
- Import into Duplicates Library – creates a temporary library of duplicates; individual records can then be added to the main library if required.
- Click Import
Mac
- From your main library's EndNote toolbar select File > Import to open the Import dialog pop-up.
- Navigate to and select the secondary library.
- Set Import Options to EndNote Library
- if Import Options are not showing click the Options button in the bottom left of the pop up.
- Choose an option for Duplicates:
- Import All - imports all references, including duplicates.
- Discard Duplicates - imports references apart from the ones that are duplicated in both libraries (recommended).
- Import into Duplicates Library – creates a temporary library of duplicates; individual records can then be added to the main library if required.
- Click Import
Share your Library or groups
You can share your synced EndNote 2025 library with up to 1,000 other users.
All members of the shared library need to have the desktop version of EndNote activated with sync preferences, and be connected to the internet in order to send and receive changes.
Note: Please be aware that sharing the full text of articles, book chapters and other materials from the AUT Library's subscription databases with people who are not AUT staff or students may breach copyright and license agreements.
To invite people to your shared library:
- Open your synced library.
- Select File > Share
- If you are not logged into EndNote Web, you will be prompted to log in.
- In the Invite more people box, enter the email address (or addresses, separated by commas) of the people that you would like to invite to share the library.
- For each invitee, use the Permission drop-down to select the desired access level: Read & Write or Read Only.
- If desired, enter an optional message in the Add a message box.
- Click the Invite button.
Once users have accepted the invitation, their activity in the library will be documented in the Shared Library Activity Feed.
You can remove or change a person's access to your library by clicking the Settings button (the gear) next to their name.